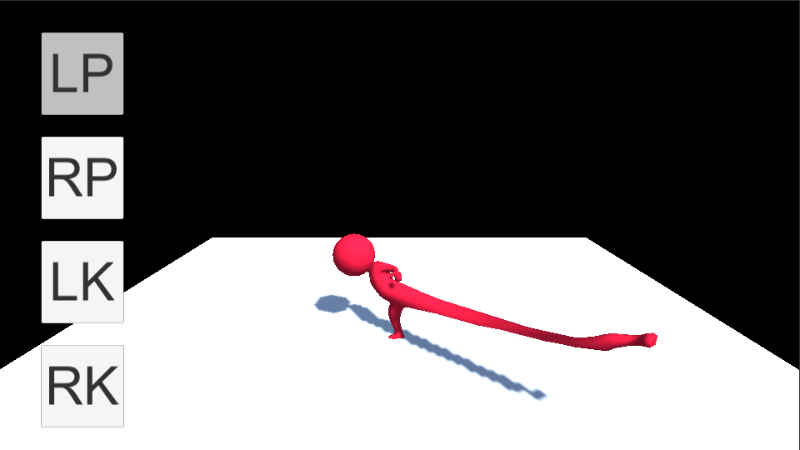
ストリートファイターシリーズのダルシムのように伸びるパンチ/キックを実装。
3Dモデルにボーンが入ってさえいれば、色んなキャラクターで使える。
*記事内の画像の番号と、手順の数字は一致していません。
↓の自作ゲームで実際に使いました。

サンプル動画
以下、ズームパンチ&ズームキックを連打するサンプル動画。
ざっくりした手順
- ラグドール*を作成。
(*全身のパーツ毎に分かれた当たり判定を付ける機能) - ジョイントを外す。
- Rigidbodyを固定。
- 手足に攻撃判定用のタグを付ける。
- 手足のRigidbodyを保持。
- 手足の固定を解除してから、AddForceで飛ばす。
詳細な手順
- モーションには、[Magicpot Inc.] Fighting Motions Vol.1(無料)を使用。
- 3Dモデルは各自、任意の物を用意。
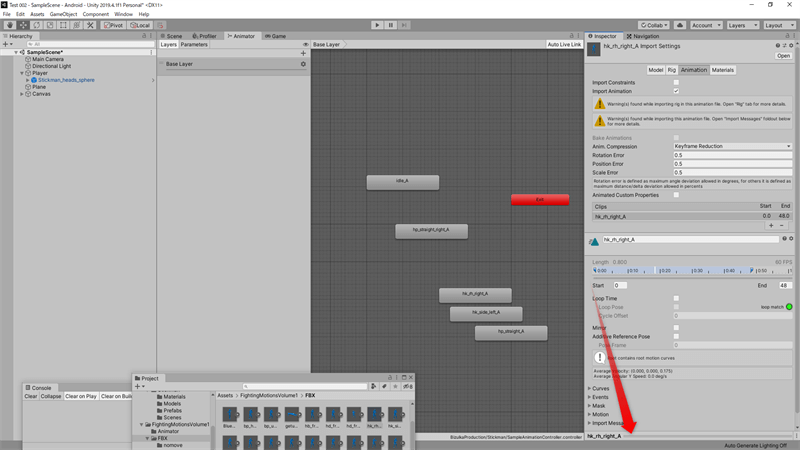
3Dモデルでモーションを使えるように準備
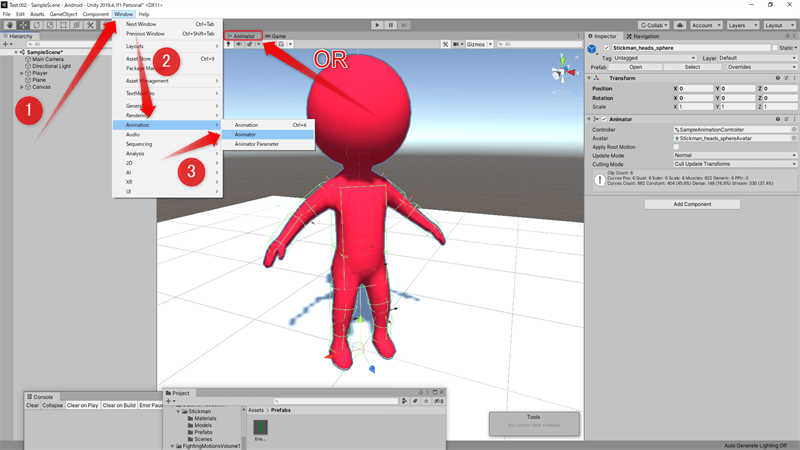
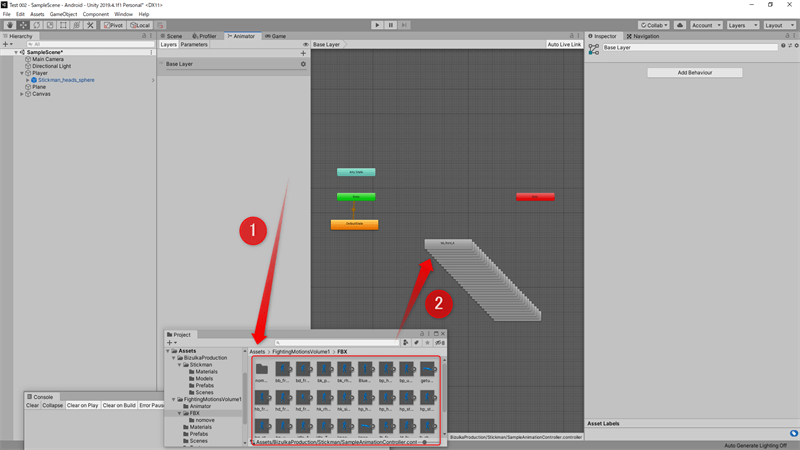
- ヒエラルキー -> 「Animatorコンポーネントがアタッチされた3Dモデル」を選択。
(無い場合は、Animatorをアタッチ&基本設定) - Animatorタブを選択。
(ない場合)上部メニュー -> Window -> Animation -> Animatorを選択。 - Animatorタブを設定。
- Projectウィンドウ -> Assets -> FightingMotionsVolume1 -> FBXフォルダを開く。
- キーボードのCtrl + Aを押して全選択。
- Animatorタブにドラッグ&ドロップして全て追加。
(勿論、使わないモーションは削除してもOK) - DefaultStateを選択 -> インスペクター -> Motionに「idle_A」を設定。
ラグドールを作成
マイナー機能で、四肢に当たり判定を作成。
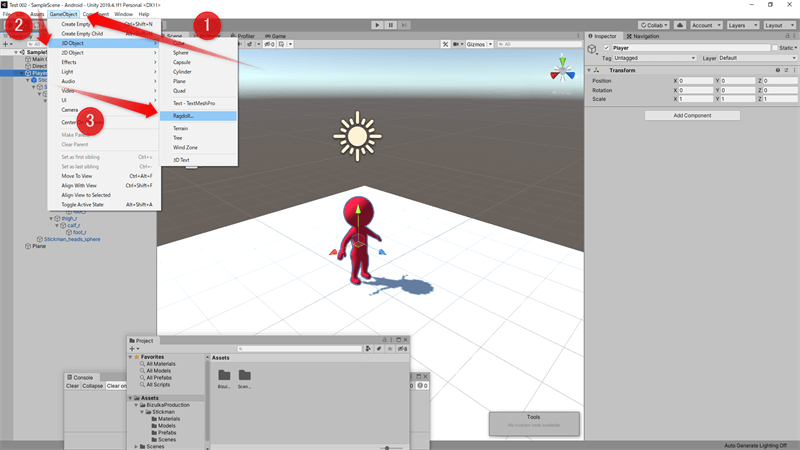
- 上部メニュー -> GameObject -> 3D Object -> Ragdoll…を選択。
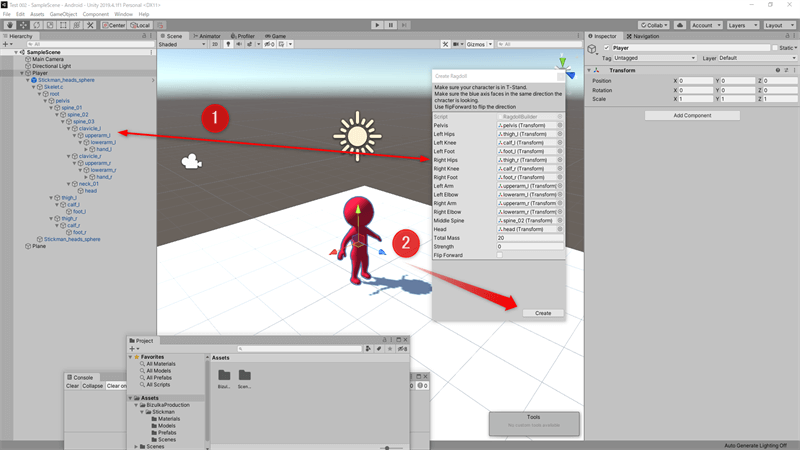
- ラグドール作成ウィザードに、キャラクターのボーンの各部位を登録。
- Hips:Thigh
- Knee:Calf
- Arm:UpperArm
- Elbow:LowerArm
- Middle Spine:Spine_02
この3Dモデルの場合は、こんな風に表記のブレがあった。
- Createを選択、正しく設定されたかSceneタブで確認。
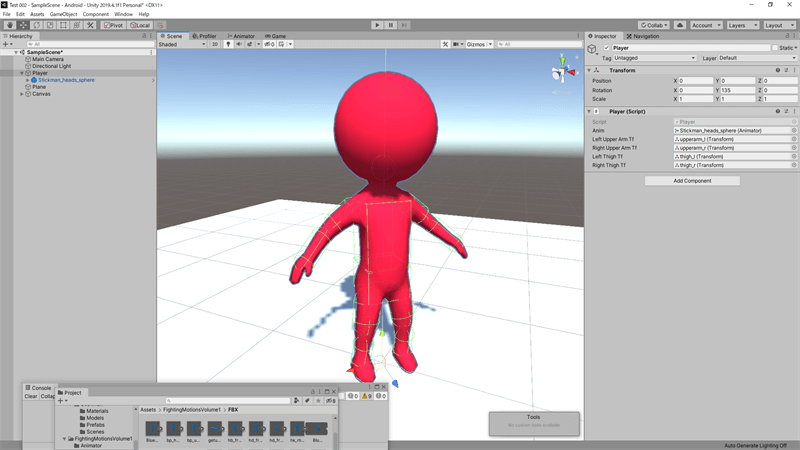
プレイヤー(攻め手)を設定
Character Jointを削除
この使い方ではCharacter Jointが要らないので取り除く。
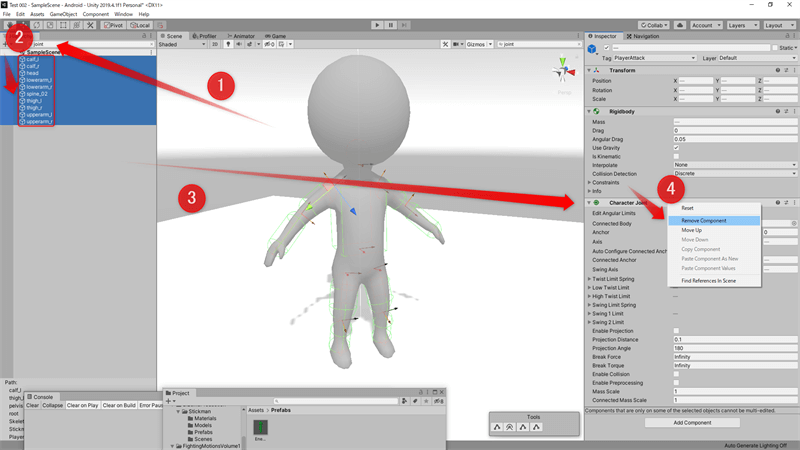
- ヒエラルキー -> 検索窓に”joint”と入力。
- 検索結果のオブジェクトを全て選択。
- インスペクター -> Character Jointコンポーネント -> 右クリック -> Remove Component
Rigidbodyを固定
そのままでは攻撃を放つ前に倒れてしまうので、Rigidbodyを固定する。
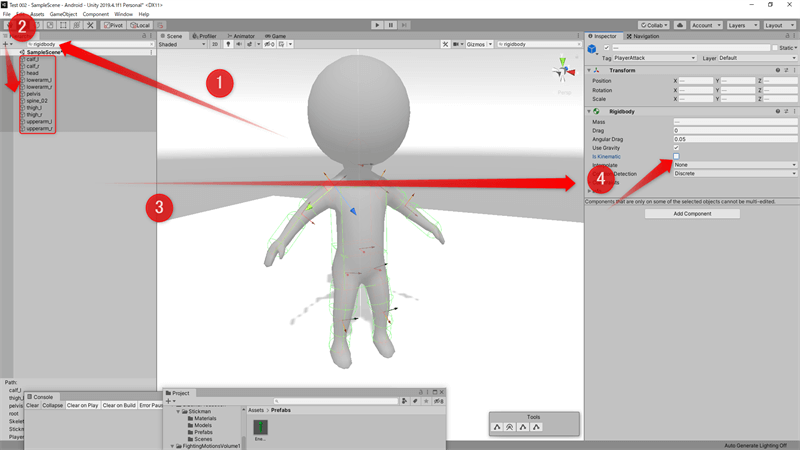
- そのままではズームパンチを放つ前に倒れてしまうのでRigidbodyを固定する。
- ヒエラルキー -> 検索窓に”rigidbody”と入力。
(他のRigidbodyが混ざってしまう場合は、プレハブ化してプレハブ画面のヒエラルキーから) - 検索結果のオブジェクトを全て選択。
- インスペクター -> Rigidbodyコンポーネント -> Is Kinematicを有効化。
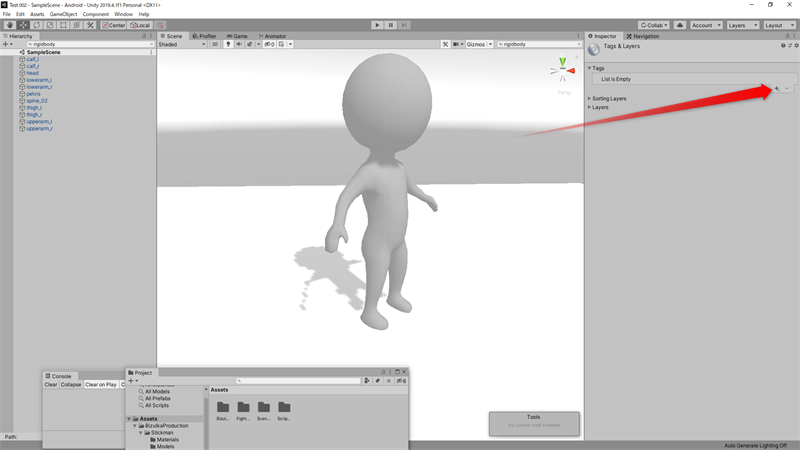
攻撃判定用のタグを設定
タグを追加
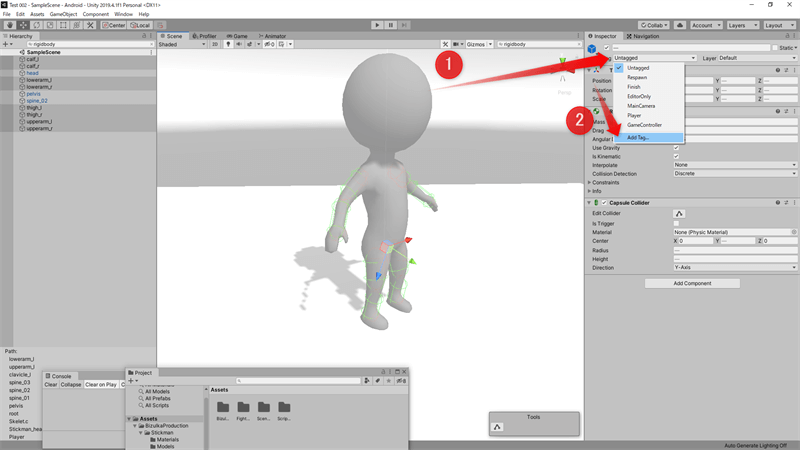
- どれでも良いので、適当にオブジェクトを選択。
- インスペクター -> Tag -> Add Tag…を選択、Tags & Layers画面を開く。
- Tags -> +を選択、「PlayerAttack」タグを追加。
(後述のコード内のタグ名と一致させれば任意の名前でOK)
四肢にタグを設定
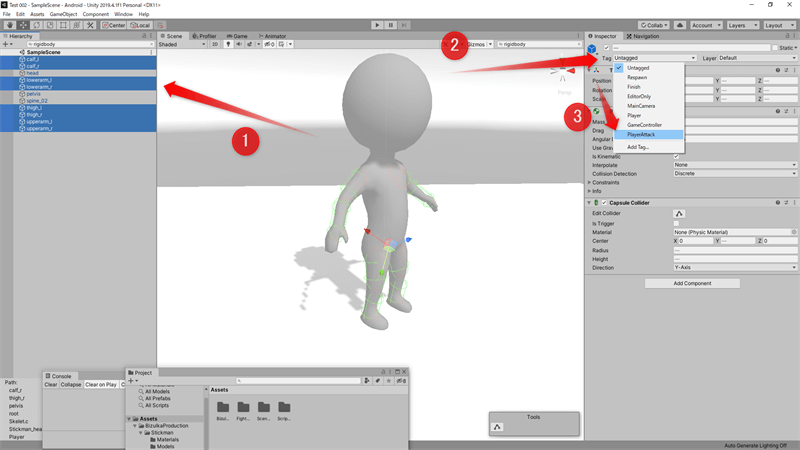
- 攻撃判定用のタグを設定。
- ヒエラルキー -> 四肢のオブジェクトを選択。
(前述の「検索窓に”rigidbody”と入力」の手法を使うと、やり易い) - インスペクター -> Tag -> PlayerAttackを選択、タグを設定。
コード
using System.Collections;
//使わなかったので、一応コメントアウト。
//using System.Collections.Generic;
using UnityEngine;

public class Player : MonoBehaviour
{


//PlayerのAnimatorをインスペクターから紐付けしておく。
	[SerializeField]
	Animator anim;


//対応するボーンのTransformをインスペクターから紐付けしておく。
	[SerializeField]
	Transform leftUpperArmTf;

	[SerializeField]
	Transform rightUpperArmTf;

	[SerializeField]
	Transform leftThighTf;

	[SerializeField]
	Transform rightThighTf;

//対応するパーツから下の全てのRigidbody。
	Rigidbody[] leftArmChiildrenRigidbody;
	Rigidbody[] rightArmChiildrenRigidbody;
	Rigidbody[] leftLegChiildrenRigidbody;
	Rigidbody[] rightLegChiildrenRigidbody;


//アニメーション名の定数。
	static readonly string IdleStr = "idle_A";
	static readonly string LeftPunchStr = "hp_straight_A";
	static readonly string RightPunchStr = "hp_straight_right_A";
	static readonly string LeftKickStr = "hk_side_left_A";
	static readonly string RightKickStr = "hk_rh_right_A";


	void Awake()
	{
		leftArmChiildrenRigidbody = leftUpperArmTf.GetComponentsInChildren<Rigidbody>();
		rightArmChiildrenRigidbody = rightUpperArmTf.GetComponentsInChildren<Rigidbody>();
		leftLegChiildrenRigidbody = leftThighTf.GetComponentsInChildren<Rigidbody>();
		rightLegChiildrenRigidbody = rightThighTf.GetComponentsInChildren<Rigidbody>();
	}

//(モーションの途中から開始させるので)ズームパンチを開始するディレイ。
//モーションのプレビューを見て、ズームパンチ開始に最適なタイミングの秒数を設定。
//Animation Eventで管理しても良いが、Animatorと同じオブジェクトにスクリプトを追加しないといけない。
	float leftZoomPunchDelay = 0.2f * 0.4f;
	float rightZoomPunchDelay = 0.4f * 0.3f;
	float leftZoomKickDelay = 0.7f * 0.45f;
	float rightZoomKickDelay = 0.8f * 0.38f;

//トータルの長さはDelay + Durationになる。
//任意の値。
	float zoomPunchDuration = 1.5f;


//ズームパンチを飛ばす力。
//任意の値。
	float attackForce = 20.0f;

//ズームパンチを飛ばす力のY方向への補正値。
	Vector3 upwardsModifier = new Vector3(0, 2.5f, 0);

//コルーチンが多重実行されるのを防ぐ為に管理する。
	Coroutine leftZoomPunch;
	Coroutine rightZoomPunch;
	Coroutine leftZoomKick;
	Coroutine rightZoomKick;


//アクション開始、ボタンリスナー等に登録。
	public void StartLeftZoomPunch()
	{
		ResetZoomAttackCoroutine();

		leftZoomPunch = StartCoroutine("LeftZoomPunch");
	}
	public void StartRightZoomPunch()
	{
		ResetZoomAttackCoroutine();

		rightZoomPunch = StartCoroutine("RightZoomPunch");
	}
	public void StartLeftZoomKick()
	{
		ResetZoomAttackCoroutine();

		leftZoomKick = StartCoroutine("LeftZoomKick");
	}
	public void StartRightZoomKick()
	{
		ResetZoomAttackCoroutine();

		rightZoomKick = StartCoroutine("RightZoomKick");
	}


	IEnumerator LeftZoomPunch()
	{
//同じモーションを連続で再生した場合に、最初の状態から再生されるようにしている。
		anim.PlayInFixedTime(LeftPunchStr, -1, 0f);

		yield return new WaitForSeconds(leftZoomPunchDelay);


		for (int i = 0; i < leftArmChiildrenRigidbody.Length; i++) {
			leftArmChiildrenRigidbody[i].isKinematic = false;
		}

//Animatorがボーンの座標を制御しているので、無効化する。
		anim.enabled = false;


		for (int i = 0; i < leftArmChiildrenRigidbody.Length; i++) {
			leftArmChiildrenRigidbody[i].AddForce(transform.forward * attackForce + upwardsModifier, ForceMode.VelocityChange);
		}


		yield return new WaitForSeconds(zoomPunchDuration);


		for (int i = 0; i < leftArmChiildrenRigidbody.Length; i++) {
			leftArmChiildrenRigidbody[i].isKinematic = true;
		}


//通常のIdleモーションに戻す為に、Animatorを有効化する。
		anim.enabled = true;

//Animatorタブで各モーションからIdleモーションに移行するように設定したら省いても良い。
		anim.Play(IdleStr);

		leftZoomPunch = null;
	}

	IEnumerator RightZoomPunch()
	{
		anim.PlayInFixedTime(RightPunchStr, -1, 0f);

		yield return new WaitForSeconds(rightZoomPunchDelay);


		for (int i = 0; i < rightArmChiildrenRigidbody.Length; i++) {
			rightArmChiildrenRigidbody[i].isKinematic = false;
		}


		anim.enabled = false;


		for (int i = 0; i < rightArmChiildrenRigidbody.Length; i++) {
			rightArmChiildrenRigidbody[i].AddForce(transform.forward * attackForce + upwardsModifier, ForceMode.VelocityChange);
		}


		yield return new WaitForSeconds(zoomPunchDuration);


		for (int i = 0; i < rightArmChiildrenRigidbody.Length; i++) {
			rightArmChiildrenRigidbody[i].isKinematic = true;
		}


		anim.enabled = true;


		anim.Play(IdleStr);

		rightZoomPunch = null;
	}


	IEnumerator LeftZoomKick()
	{
		anim.PlayInFixedTime(LeftKickStr, -1, 0f);

		yield return new WaitForSeconds(leftZoomKickDelay);


		for (int i = 0; i < leftLegChiildrenRigidbody.Length; i++) {
			leftLegChiildrenRigidbody[i].isKinematic = false;
		}


		anim.enabled = false;


		for (int i = 0; i < leftLegChiildrenRigidbody.Length; i++) {
			leftLegChiildrenRigidbody[i].AddForce(transform.forward * attackForce + upwardsModifier, ForceMode.VelocityChange);
		}


		yield return new WaitForSeconds(zoomPunchDuration);


		for (int i = 0; i < leftLegChiildrenRigidbody.Length; i++) {
			leftLegChiildrenRigidbody[i].isKinematic = true;
		}


		anim.enabled = true;


		anim.Play(IdleStr);

		leftZoomKick = null;
	}

	IEnumerator RightZoomKick()
	{
		anim.PlayInFixedTime(RightKickStr, -1, 0f);

		yield return new WaitForSeconds(rightZoomKickDelay);


		for (int i = 0; i < rightLegChiildrenRigidbody.Length; i++) {
			rightLegChiildrenRigidbody[i].isKinematic = false;
		}


		anim.enabled = false;


		for (int i = 0; i < rightLegChiildrenRigidbody.Length; i++) {
			rightLegChiildrenRigidbody[i].AddForce(transform.forward * attackForce + upwardsModifier, ForceMode.VelocityChange);
		}


		yield return new WaitForSeconds(zoomPunchDuration);


		for (int i = 0; i < rightLegChiildrenRigidbody.Length; i++) {
			rightLegChiildrenRigidbody[i].isKinematic = true;
		}


		anim.enabled = true;


		anim.Play(IdleStr);

		rightZoomKick = null;
	}


//多重実行防止。
	void ResetZoomAttackCoroutine()
	{
		if (leftZoomPunch != null) {
			StopCoroutine(leftZoomPunch);
			leftZoomPunch = null;

			for (int i = 0; i < leftArmChiildrenRigidbody.Length; i++) {
				leftArmChiildrenRigidbody[i].isKinematic = true;
			}

//Animatorを一旦有効にして、ボーン位置をリセット。
			anim.enabled = true;
		}

		if (rightZoomPunch != null) {
			StopCoroutine(rightZoomPunch);
			rightZoomPunch = null;

			for (int i = 0; i < rightArmChiildrenRigidbody.Length; i++) {
				rightArmChiildrenRigidbody[i].isKinematic = true;
			}

			anim.enabled = true;
		}

		if (leftZoomKick != null) {
			StopCoroutine(leftZoomKick);
			leftZoomKick = null;

			for (int i = 0; i < leftLegChiildrenRigidbody.Length; i++) {
				leftLegChiildrenRigidbody[i].isKinematic = true;
			}

			anim.enabled = true;
		}

		if (rightZoomKick != null) {
			StopCoroutine(rightZoomKick);
			rightZoomKick = null;

			for (int i = 0; i < rightLegChiildrenRigidbody.Length; i++) {
				rightLegChiildrenRigidbody[i].isKinematic = true;
			}

			anim.enabled = true;
		}
	}


/*
//オブジェクトプール化した場合のゲームオーバー時等でのリセット用。
	void Reset()
	{
		ResetZoomAttackCoroutine();
		anim.Play(IdleStr);
	}
*/

/*
	static readonly string EnemyAttackStr = "EnemyAttack";

//プレイヤー側の攻撃接触判定の一例。
	void OnTriggerEnter(Collider col)
	{
		if (col.gameObject.CompareTag(EnemyAttackStr)) {
			Damaged();
		}
	}
*/

/*
	static readonly string PlayerAttackStr = "PlayerAttack";

//エネミー側の攻撃接触判定の一例。
	void OnTriggerEnter(Collider col)
	{
		if (col.gameObject.CompareTag(PlayerAttackStr)) {
			Damaged();
		}
	}
*/


}
別のモーションを使用する場合
別のモーションを使ってズームパンチ/キックを出す場合は、コード内のディレイを変更する。
プレビュー画面に表示される値は、フレーム数とパーセンテージの為、時間に変換する必要がある。
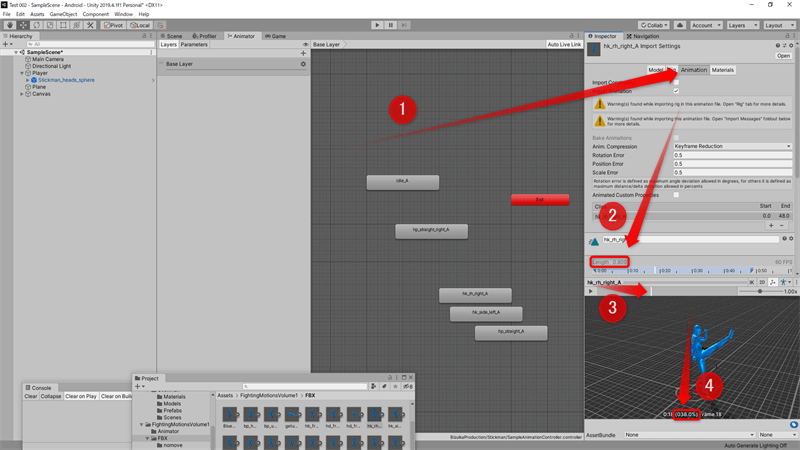
秒数の確認
- Animatorタブ -> パンチ、キックのモーションのAnimation State Machineを選択。
- インスペクター -> Motion -> Animation Clip名を選択。
- ProjectウィンドウでAnimation Clipが選択されるので親のFBXを選択。
- インスペクター -> Animationに切り替え。
- プレビュー画面で表示されている3Dモデル下の、(000.0%)の値 / 100 * Animation ClipのLengthが秒数。
この場合だと、「0.38f * 0.8f」
(プレビュー画面がない場合)最下部にAnimation Clip名が太字で表示されているのを選択。
エネミー(受け手)を設定
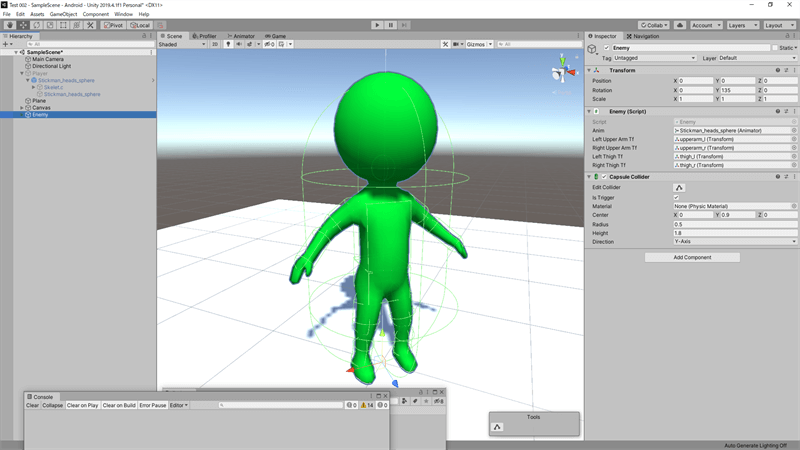
OnCollisionEnterで受けると、Rigidbodyとスクリプトを同じオブジェクトにアタッチしないといけない。
スクリプト数が増えると嫌なので、OnTriggerEnterで受ける。
- ヒエラルキー -> キャラクター本体(メインのスクリプトをアタッチしたオブジェクト)を選択。
- Capsule Colliderをアタッチ、設定を変更。
- キャラクターより一回り大きめに設定。
(待機モーション中の腕のRigidbodyに当たると弾かれる為) - Is Trigger : 有効化
- (OnTriggerEnterが呼ばれるように、必ずキャラクター本体にアタッチ)
- キャラクターより一回り大きめに設定。